
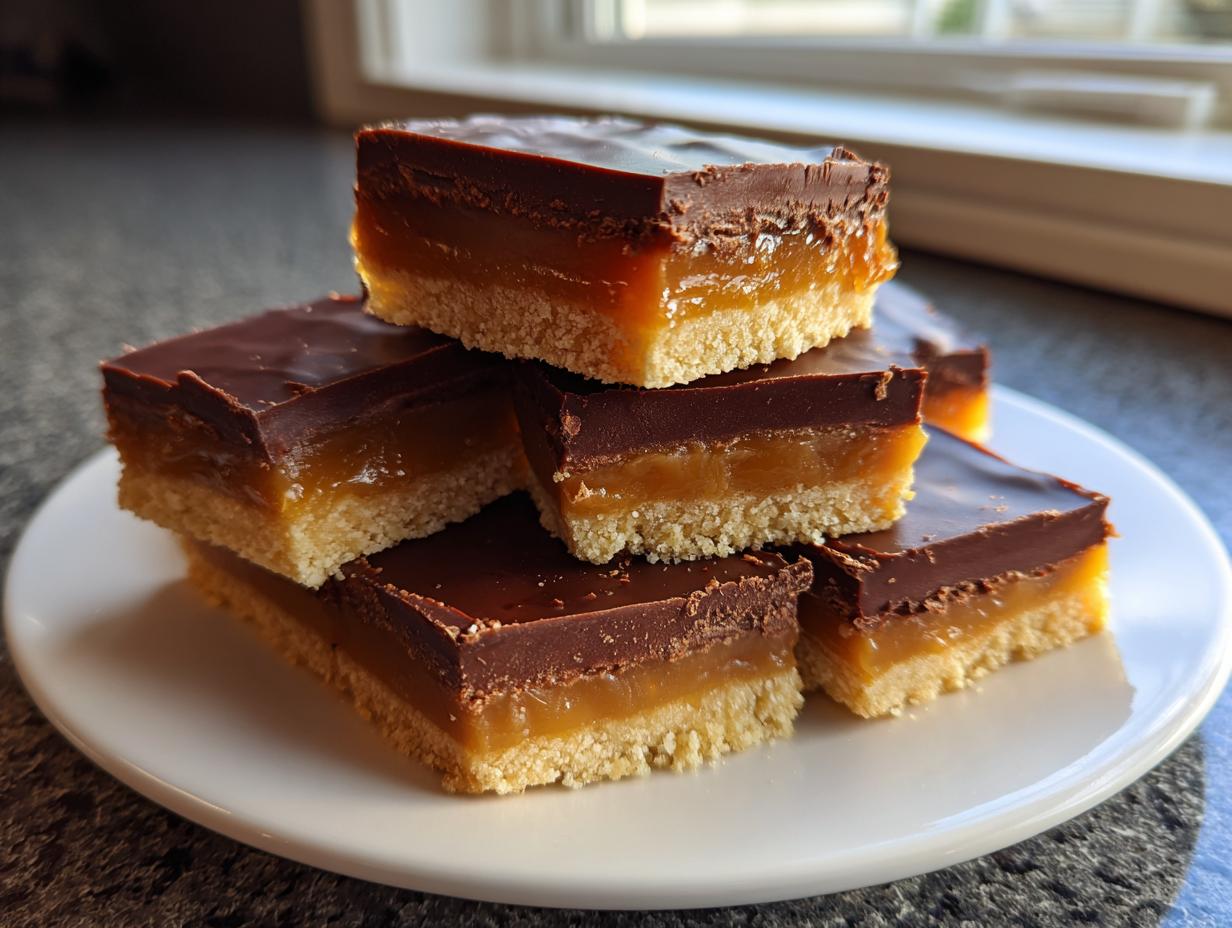
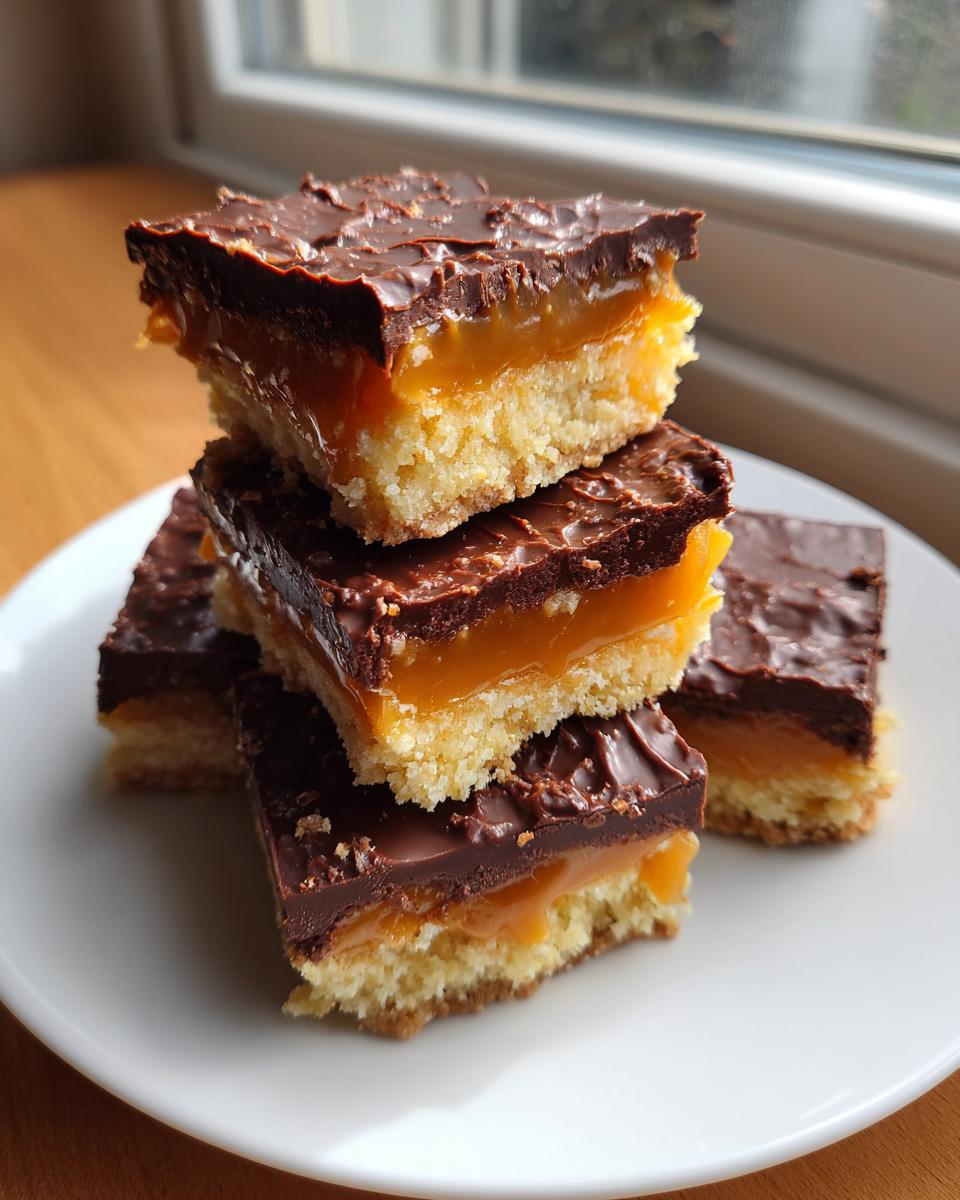
If you think making a truly great candy bar at home is too complicated—I mean, we’re talking layers of buttery shortbread, gooey caramel alchemy, and that perfect chocolate shell—then you haven’t tried this recipe yet. I used to think those incredible, perfectly textured store-bought candies were out of my league. But I’m here to tell you, replacing that snack craving with homemade twix bars is absolutely achievable, even on a busy Tuesday night.
This Copycat Twix Recipe is my secret weapon for building confidence in the kitchen. Once you nail this simple layering technique, you realize those gourmet candy bar replicas aren’t reserved for professionals. Trust me, when you pull these perfect, layered Homemade Twix Bars out of the chocolate coating, you’ll feel like you mastered every culinary trick known to candy makers. It’s easier than you think, and the flavor? Unbeatable. You can read more about our kitchen philosophy here: Kitchenican understands the joy of making something delicious from scratch.
- Why You Will Love This Copycat Twix Recipe
- Essential Ingredients for Perfect Homemade Twix Bars
- Step-by-Step Instructions for Your Twix Cookie Bars Recipe
- Tips for Success with Your Copycat Twix Recipe
- Ingredient Notes and Substitutions for twix
- Storage & Reheating Instructions for twix
- Serving Suggestions for Bite Sized Caramel Treats
- Frequently Asked Questions About Making twix
- Estimated Nutritional Data for Homemade twix
- Share Your Homemade twix Creations
Why You Will Love This Copycat Twix Recipe
I know you’re looking for that perfect sweet fix, and these bars deliver way beyond expectation. Seriously, stop settling for the wrapper, because making this Homemade Twix Recipe yourself is an absolute game-changer. Here’s why you need to grab your butter right now:
- Incredible Flavor Match: We nail that classic candy bar taste—the buttery shortbread, the chewy caramel core, and the rich chocolate—it tastes exactly like the real thing, only better because you made it!
- Texture Perfection: Forget dry cookies or brittle caramel. This recipe guarantees that satisfying combination of crisp shortbread and gorgeously soft, gooey caramel in every single bite.
- Perfect for Sharing (or Not!): This makes a decent batch, perfect for holiday gifting or filling up your snack drawer. They transform easily into Bite Sized Caramel Treats.
- It’s Accessible Baking: While it has layers, there’s no complex tempering or difficult pastry work involved. If you can bake a simple cookie, you can make these Twix Inspired Desserts.
- The Base is an Easy Dessert with Shortbread Base: The shortbread is quick, requiring just mixing and pressing. It’s the best foundation for any layered bar recipe, hands down.
- Better than Store-Bought: Honestly, they are richer, fresher, and you control the quality of every ingredient in this whole Chocolate Caramel Candy Recipe.
Essential Ingredients for Perfect Homemade Twix Bars
When you’re tackling a masterpiece like these Homemade Twix Bars, the ingredients aren’t just suggestions; they’re the building blocks of that iconic crunch and chew. Don’t skimp here, especially on the butter! Making a great Chocolate Caramel Candy Recipe from scratch means you get to control the richness, and these measurements ensure you get that perfect layered structural integrity we’re aiming for. Everything is broken down by layer, just like we build the bar itself.
For the Shortbread Base: Easy Dessert with Shortbread Base
This layer has to be sturdy enough to hold up the caramel but buttery enough to melt in your mouth. We keep it super simple here—no eggs needed, just good old-fashioned creaming action. Remember, the butter must be soft, not melted! If your butter is too warm, your base will spread too much in the oven, and we need that nice, compact structure for our Easy Dessert with Shortbread Base.
- 1 cup (2 sticks) unsalted butter, softened
- 1 cup granulated sugar
- 2 1/2 cups all-purpose flour
- 1/2 teaspoon salt
For the Gooey Caramel Layer
This is where the magic happens, right? We are cooking the caramel to just the right point so it sets up firmly but still has that irresistible pull when you bite into it. If you’re serious about replicating that classic candy bar feel, I highly recommend using a candy thermometer for consistency. It takes the guesswork out of achieving that perfect texture for your Chocolate Caramel Candy Recipe.
- 1 (14 ounce) can sweetened condensed milk
- 1 cup packed light brown sugar
- 1/2 cup (1 stick) unsalted butter
- 1/4 cup light corn syrup
- 1 teaspoon vanilla extract
For the Chocolate Coating: Chocolate Coated Caramel Desserts
Chocolate coating can be tricky. You want that beautiful, glossy finish that sets up hard but melts beautifully when you eat it. That’s why we add a tiny bit of oil or shortening. It’s not just filler; it slightly lowers the viscosity of the chocolate, making it dip much easier and resulting in a thin, shatter-free layer over your Chocolate Coated Caramel Desserts.
- 12 ounces semi-sweet chocolate chips
- 1 tablespoon coconut oil or vegetable shortening
Step-by-Step Instructions for Your Twix Cookie Bars Recipe
Okay, let’s get down to the hands-on part! Making this Twix Cookie Bars Recipe feels like constructing a delicious little edible building. We move logically from the base up, and patience during the cooling steps is crucial—I know it’s hard when the house smells this good, but trust me on this! You want to ensure every layer is perfectly set before adding the next one. We want that great textural contrast, just like the candy bar! You can see how simple these Bite Sized Caramel Treats become when broken down like this, and you can get inspired by quick versions here: Check out these quick 3-ingredient Twix Bites for a faster fix.
Baking the Shortbread Caramel Layers Foundation
First things first: get that oven humming at 350°F (175°C). Line your 8×8 pan with parchment paper—leave those flaps hanging over the sides so we can lift the whole creation out later, which is a lifesaver! Mix the butter and sugar until they look fluffy—that’s where we trap the air. Gently mix in the flour and salt until it just comes together into a dough. Press that dough firmly and evenly into the bottom of the pan (that’s Ava’s tip for an even base!). Bake it for about 20 to 25 minutes until you see those edges just starting to turn a delicate golden color. Let that Shortbread Caramel Layers foundation cool completely before we move on.
Creating the Perfect Caramel for Your Twix
While the base cools, we tackle the caramel. In a saucepan over medium heat, combine the condensed milk, brown sugar, butter, and corn syrup. This step demands your attention! You absolutely must stir constantly—I mean constantly—to make sure nothing scorches on the bottom. We’re cooking this until it hits 245°F (118°C) on a candy thermometer, or until it thickens up nicely and starts pulling away from the sides of the pot. Take it off the heat right away and stir in the vanilla. This careful heating is what gives us that perfect chew for our Chocolate Caramel Candy Recipe.
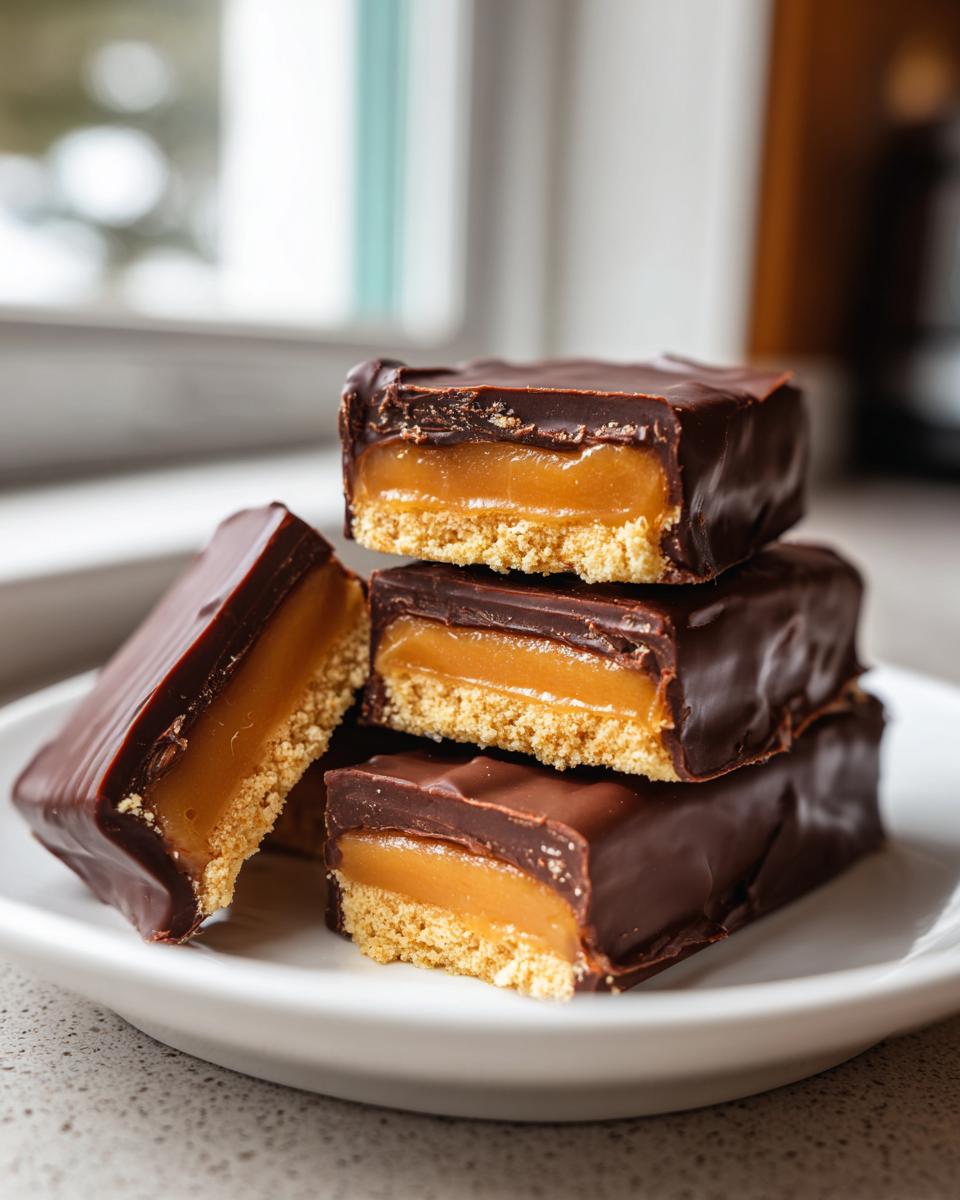
Assembling and Setting the Twix Inspired Desserts
Once the shortbread is totally cool, it’s time to marry it with the caramel. Gently pour the hot caramel over the base and spread it quickly and evenly. Remember, this caramel is hot enough to work fast! Now comes the hardest part: waiting. You need this layer to set completely before cutting. Aim for at least 2 hours at room temperature, or if you’re impatient like me, pop it in the fridge for one hour. Getting that firm set is key for clean slices for your Twix Inspired Desserts.
The Final Chocolate Dip for Your From Scratch Twix Candy
We want that professional dip texture, right? We’re melting the chocolate chips with the coconut oil (or shortening) in short bursts in the microwave. That little bit of oil is our secret weapon for a super smooth result that sets beautifully without a fussy temper. Once smooth, it’s time to dip! Hold the firm caramel shortbread bar gently, dunk it fully into the chocolate, let any excess drip off, and place it on parchment paper. Don’t worry if they look a little messy at first; the chocolate will smooth out as it sets. Let them sit until that chocolate coating is totally firm before you enjoy any of your From Scratch Twix Candy.
Tips for Success with Your Copycat Twix Recipe
Making homemade candy bars is incredibly rewarding, but sometimes the layers just don’t want to cooperate. Since we’re aiming for that beautiful, professional look with perfect, clean layers, I’ve gathered a few crucial pointers based on my trial-and-error days. Remember, precision matters when you’re dealing with caramel! If you want these Homemade Twix Bars to stand up to the store-bought competition, paying attention to the cooling and cutting stages is everything.
Here are the few things I learned to ensure every single one of my Twix Cookie Bars Recipe attempts comes out picture-perfect:
- Chill Before Cutting—Seriously Chill! This is non-negotiable for clean edges. If you try to slice the bars while the caramel is just slightly soft, you end up with pulled strings of caramel sticking to your knife, and your beautiful squares turn into messy blobs. Pop the whole slab into the refrigerator for at least an hour after the caramel has set. A cold base cuts like butter, giving you those sharp edges needed for professional-looking Bite Sized Caramel Treats.
- The Double-Dip Technique: If you find your chocolate coating is thin and you can still see bits of caramel peeking through, don’t panic! Let the first coat set completely—either for 15 minutes on the counter or 5 minutes in the fridge. Then, dip them again. A second thin layer ensures that gorgeous, opaque chocolate shell that finally seals in all that gooey goodness. It also adds a nice crunch you want in a great candy bar replica.
- Use Parchment for Easy Removal: I mention lining the pan in the steps, but it bears repeating for the shortbread base. Create large, even overhangs of parchment paper on two opposing sides of your 8×8 pan. Once everything is chilled and set, grab those parchment ‘slings’ and lift the entire block of shortbread and caramel out in one piece. This allows you to place the block on a cutting board where you can use a long, sharp knife for the neatest cuts ever. You can find some great inspiration for efficient baking techniques here: See how this recipe handles assembly.
- Manage Your Chocolate Temperature: Remember we added coconut oil or shortening? This keeps the chocolate fluid, but if you overheat it, it will seize up or become weirdly dull when it sets. Always microwave in short 30-second blasts, stirring thoroughly between each one, even if it still looks mostly solid. You want it smooth and warm, but never scalding hot when you go to dip those bars.
Ingredient Notes and Substitutions for twix
I get asked all the time about tweaking recipes, and honestly, that shows you’re thinking like a real home cook! With this twix recipe, the fundamental structure relies on getting those three layers right, but you definitely have a little wiggle room, especially when it comes to the chocolate. Our Kitchenican philosophy is about empowerment, which means using what you have on hand as long as it doesn’t compromise the texture of that shortbread or caramel. Keep substitutions simple, and you’ll still end up with incredible Homemade Twix Bars.
But let’s talk specifics—because switching things up in the caramel layer can change the whole structure, and we don’t want to end up with a runny mess when we need those nice defined Shortbread Caramel Layers.
Chocolate Choices: Dark vs. Milk
Semi-sweet is my go-to because it balances the sweetness of the homemade caramel perfectly. However, if you prefer something less sweet, using dark chocolate chips works wonderfully. Dark chocolate gives a slightly more intense, almost gourmet flavor to these Chocolate Caramel Candy Recipe bars. If you use milk chocolate, just be prepared: the final product will be significantly sweeter overall because milk chocolate already contains more sugar. Either way, make sure you use good quality chips that melt smoothly!
Can I Skip the Corn Syrup?
This is a tricky one when making homemade candy. Corn syrup might sound old-fashioned, but it plays a vital role here, especially if you don’t want to use a candy thermometer every time. It helps stabilize the sugar structure, which prevents crystalizing (that grainy texture) and keeps your caramel soft and chewy. If you absolutely must skip it, you can try substituting the 1/4 cup of corn syrup with an equal amount of high-quality honey, but you will need to watch the caramel cook time very carefully, as honey behaves differently under heat.
Brown Sugar in the Caramel
Please don’t swap the light brown sugar for white sugar in the caramel layer! I know it seems like a small change, but that molasses content in the brown sugar is what gives the caramel its deep, rich color and flavor that distinguishes it from plain cooked sugar. Sticking to light brown sugar ensures you capture the true essence of this Copycat Twix Recipe.
Making the Shortbread Vegan or Gluten-Free
For the base: you can generally swap the regular butter for a good vegan butter substitute (one that is solid stick form, not soft tub style) to maintain that essential fat content. For gluten-free baking, you can usually substitute the all-purpose flour with a high-quality 1-to-1 GF blend. Just remember that GF flour blends can sometimes absorb liquid differently, so let your shortbread dough rest for about five minutes before pressing it into the pan to ensure it’s not too crumbly!
Storage & Reheating Instructions for twix
Now that you’ve gone through all that effort creating the most incredible twix copycat bars, the next big question is: how do I keep them perfect? Since these homemade beauties have that delicious, soft caramel layer, storage is a little different than just leaving a plain cookie on the counter. You want to maintain that perfectly molded shape, and you definitely want that caramel to stay chewy and not turn rock hard!
For the absolute best texture replication of the original candy bar, you should store your completed Homemade Twix Bars in the refrigerator. The cold temperature helps keep the caramel firm and makes those cuts super clean if you need to slice them smaller later on. Keep them airtight! If you let them sit out in a container uncovered for too long, the chocolate coating can start to get that dull look, or the caramel might absorb kitchen smells.
Room Temperature vs. Fridge for Maximum Freshness
While the fridge is my preferred spot for long-term storage—they last great for up to two weeks this way—you don’t want to eat them ice-cold. A super cold bar will have a very hard chocolate shell and a very firm caramel center. For the ideal chewiness and that perfect melt-in-your-mouth quality, pull your bars out onto a plate about 20 to 30 minutes before serving. This little bit of tempering time brings the caramel back to life!
If you are making these for a party the same day, leaving them on the counter is fine, provided your kitchen isn’t super warm. At room temperature, they’ll only stay perfectly set for about 4 to 6 hours. After that, the caramel starts to soften up too much, especially if you’ve cut them into those lovely Bite Sized Caramel Treats.
Handling Bars That Get Too Soft
Oops, did your kitchen get warm? Sometimes if the room is humid or hot, the caramel can get a little weepy or soft, even if it’s been chilled. First line of defense: pop them straight back into the fridge for an hour or so to firm everything up again. You don’t want to reheat these—that would just melt the chocolate coating everywhere! If they’ve gotten oddly soft, you can freeze the whole slab (before cutting) for about an hour, then immediately slice them using a hot, clean knife. Dipping them back into the chocolate coating if they look messy isn’t really an option once they have been cut, so prevention through proper chilling is definitely the way to go!
I’ve never needed to microwave these to soften them, because that ruins the chocolate shell entirely. But if you are eating a slice directly from the fridge and find the caramel just a touch too firm, letting it sit for those 30 minutes is the best trick for enjoying this Chocolate Caramel Candy Recipe as intended.
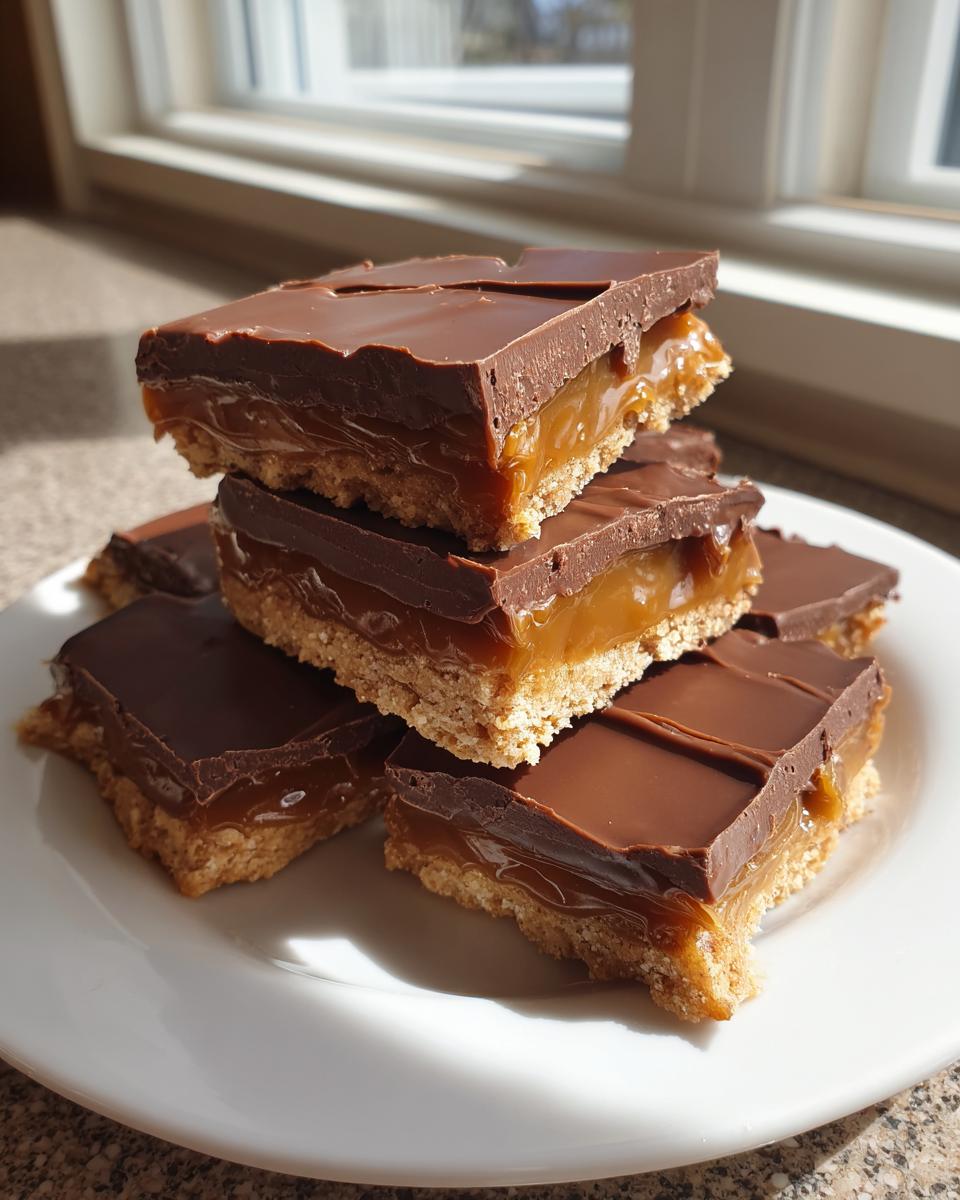
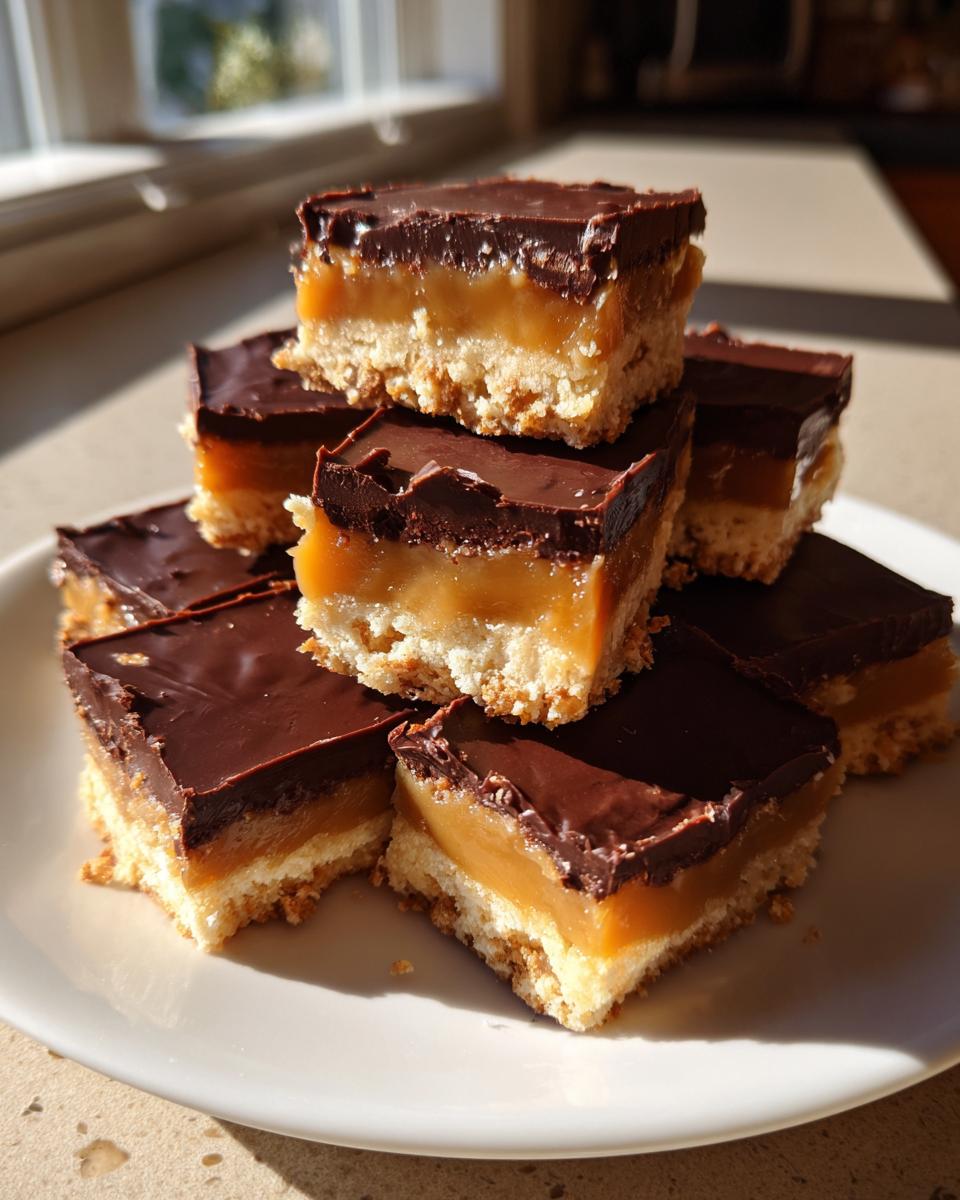
Serving Suggestions for Bite Sized Caramel Treats
I love how surprisingly versatile these Homemade Twix Bars become once you cut them down! When they are perfectly chilled and neatly sliced, they transition from a simple craving fix to something genuinely fun for sharing. Honestly, after baking a batch of these Copycat Twix Recipe bars, the hardest part is deciding *when* to eat them!
Because they have that perfect balance of crunch, chew, and chocolate, they pair beautifully with nearly anything. Forget boring store-bought cookies; these Bite Sized Caramel Treats elevate any casual snack time into something a little special. Don’t forget to share your creations, or hoard them all for yourself—I won’t tell!
Perfect Pairings for Your Twix
When I know I’m having a batch of these ready, I always make sure I have the right beverage nearby. The rich sweetness and satisfying texture of the shortbread and caramel crave something simple to cut through it:
- A Simple Glass of Cold Milk: Is there anything more nostalgic? The cold dairy washes down that rich chocolate coating perfectly. It’s an absolute classic pairing for any chocolate-heavy bar, and it works wonders here.
- Robust Black Coffee: If you’re enjoying these as an afternoon treat, the slight bitterness of strong coffee—maybe an Americano or a dark roast—contrasts sharply with the sweet caramel layer, making each bite taste even more complex.
- Simple Tea Selection: A classic Earl Grey or an English Breakfast tea complements the buttery notes in the shortbread base beautifully without competing with the caramel flavor.
These tiny, satisfying nuggets truly shine when they’re part of a larger spread, too. If you’re looking for ideas after seeing how easy they are to replicate, check out how others are presenting these irresistible desserts online: See how these Bite Sized Caramel Treats can be made even simpler!
Occasions to Serve Your Twix Inspired Desserts
Honestly, you don’t need an occasion for a Twix Inspired Dessert, but they really shine when they are part of a bigger offering. They stack up beautifully on dessert platters because they hold their shape so well, even at room temperature for a few hours!
- Holiday Candy Platters: Forget fussing with complicated fudge! These stack right up next to peppermint bark or peanut butter cups. Their uniform shape makes the platter look so neat and professional. They feel instantly festive.
- Lunchbox Surprises: Since they are fully enrobed in chocolate, they travel better than many other cookies or bars. Cut them into smaller, true ‘bite-size’ squares for a fantastic surprise in lunchboxes or for a mid-afternoon work snack. They hold up better than anything with frosting!
- Movie Night Munchies: Since the chocolate sets firmly, you can handle these easily in the dark without making a huge mess—perfect for a cozy night in. They satisfy that deep, craving crunch better than anything else available.
Making this From Scratch Twix Candy recipe gives you such a boost of kitchen confidence. Go ahead, make a double batch—you’ll be glad you did when you run out much faster than you ever expected!
Frequently Asked Questions About Making twix
I totally get it—when you put in the effort to make something this delicious, you want it to be perfect! These twix bars involve a few distinct steps, so naturally, questions pop up. I’ve compiled the ones I hear most often from fellow home cooks trying this Copycat Twix Recipe for the first time. Don’t worry if things seem tricky; that’s what troubleshooting is for! We want your Bite Sized Caramel Treats to be flawless.
Can I make this twix recipe without a candy thermometer?
Yes, you totally can skip the thermometer, but you have to be disciplined with your stirring and timing! If you don’t have a thermometer, you need to watch for the visual cues. When the caramel mixture is ready, it should be noticeably thick, boiling steadily (not bubbling wildly), and when you lift your spoon out, the caramel coating the spoon should look like thick, flowing honey that holds its shape for just a second before drooping. It should pull away cleanly from the sides of the pot when you stir it slowly. If you take a tiny drop and put it in a cup of cold water, it should form a soft, pliable ball that you can still press with your finger. If it dissolves instantly, keep cooking; if it’s rock hard, you cooked it too long!
What is the best way to get a smooth chocolate coating on my twix?
Ah, the elusive perfect chocolate shell! There are two things that make a huge difference here. First, you absolutely must ensure the caramel layer is completely cooled and firm. If the caramel is even slightly warm or soft, the chocolate will melt into it, creating a dull, oily mess instead of a crisp shell. Second, for that professional smoothness, that tiny bit of coconut oil or shortening is essential! It thins the melted chocolate just enough so that when you dip your Homemade Twix Bars, the coating flows out evenly around the bar, leaving a thin, glossy finish rather than a thick, globby layer. Make sure you let that excess chocolate drip off completely before setting them down to cool.
If you have any other questions while you’re whipping up this batch, please feel free to reach out and connect with us here: Let’s talk about your baking process!
Estimated Nutritional Data for Homemade twix
I’ve got the nutrition facts here for you, but I want to be super upfront about this first! Remember, we are making rich, layered twix bars from scratch. These values are estimates only, based on the ingredients list I provided and standard preparation methods. They aren’t calculated by a lab, so consider them a general guide, not a strict diet plan. We’re focused on the joy of making these incredible Chocolate Caramel Candy Recipe bars, not counting every single calorie!
We made this batch to yield about 16 bars, so the numbers below reflect one single, glorious square of this homemade candy. If you cut yours into smaller Bite Sized Caramel Treats, your personal serving size will, of course, be lower!
- Serving Size: 1 bar
- Calories: 350
- Sugar: 35g
- Sodium: 110mg
- Fat: 22g
- Saturated Fat: 14g
- Unsaturated Fat: 8g
- Trans Fat: 0.5g
- Carbohydrates: 36g
- Fiber: 1g
- Protein: 4g
- Cholesterol: 30mg
If you do peek at these numbers and realize you need more information on how we handle data here on the blog, you can always review our policies right here: Kitchenican is committed to transparency regarding site policies. Don’t let the sugar count scare you off—these are special occasion treats, after all! Go ahead and enjoy that perfect bite of shortbread, caramel, and chocolate!
Share Your Homemade twix Creations
Wow, you did it! You faced down the layers, you tamed the caramel, and you’ve got a whole tray of incredible, melt-in-your-mouth twix bars sitting right there in your kitchen. I am so genuinely thrilled for you! Creating something that complex-tasting from scratch is a huge win, and that’s exactly what Kitchenican is all about—celebrating those moments of kitchen victory.
Now that your house probably smells like the best candy factory in town, I would absolutely love to hear how it went. Did your shortbread base come out perfectly sturdy? Did achieving that beautiful chocolate shell give you a massive confidence boost? Don’t be shy! Taking that first step to make a candy bar replica like this is huge, and sharing your success helps me know I’m guiding you the right way!
The best compliment you can give any recipe here on the blog is a rating and a quick comment down below. If these Homemade Twix Bars hit that sweet spot and genuinely tasted like the candy you grew up loving, please take 30 seconds to give it a solid 5-star rating. That helps other cooks who might be intimidated by making their own Copycat Twix Recipe see that they absolutely can do this!
If you managed to snap a picture of your glossy finished bars—especially those clean, layered slices—you should totally tag me on social media! Seeing your versions of these twix delights truly makes my day and inspires the next recipe I tackle. Thank you so much for trusting this journey with me; happy snacking!
PrintHomemade Twix Bars: The Copycat Recipe You Can Make Today
You can make candy bar favorites at home. This recipe shows you how to create rich, layered Homemade Twix Bars with shortbread, caramel, and chocolate coating. Build your confidence by making this satisfying treat from scratch.
- Prep Time: 25 min
- Cook Time: 30 min
- Total Time: 3 hours 55 min
- Yield: 16 bars 1x
- Category: Dessert
- Method: Baking and Chilling
- Cuisine: American
- Diet: Vegetarian
Ingredients
- For the Shortbread Base: 1 cup (2 sticks) unsalted butter, softened
- 1 cup granulated sugar
- 2 1/2 cups all-purpose flour
- 1/2 teaspoon salt
- For the Caramel Layer: 1 (14 ounce) can sweetened condensed milk
- 1 cup packed light brown sugar
- 1/2 cup (1 stick) unsalted butter
- 1/4 cup light corn syrup
- 1 teaspoon vanilla extract
- For the Chocolate Coating: 12 ounces semi-sweet chocolate chips
- 1 tablespoon coconut oil or vegetable shortening
Instructions
- Prepare the shortbread: Preheat your oven to 350°F (175°C). Line an 8×8 inch baking pan with parchment paper, leaving an overhang for easy removal.
- In a large bowl, beat the softened butter and granulated sugar together until light and fluffy.
- Gradually add the flour and salt, mixing on low speed until just combined into a crumbly dough.
- Press the dough evenly into the bottom of the prepared pan. Bake for 20 to 25 minutes, or until the edges are lightly golden. Let the shortbread cool completely in the pan.
- Make the caramel: In a medium saucepan, combine the sweetened condensed milk, brown sugar, butter, and corn syrup.
- Cook over medium heat, stirring constantly, until the mixture reaches 245°F (118°C) on a candy thermometer, or until it thickens significantly, about 8 to 10 minutes. Remove from heat and stir in the vanilla extract.
- Pour the hot caramel evenly over the cooled shortbread base. Let the caramel set at room temperature for at least 2 hours, or chill for 1 hour until firm.
- Cut the cooled caramel and shortbread into bar shapes, similar to candy bar size.
- Melt the chocolate: Place the chocolate chips and coconut oil in a microwave-safe bowl. Microwave in 30-second intervals, stirring well after each, until the chocolate is smooth.
- Dip each caramel shortbread bar into the melted chocolate, ensuring it is fully coated. Place the coated bars on a parchment-lined baking sheet.
- Allow the chocolate to set completely at room temperature or chill briefly until firm. Slice into individual bars if needed.
Notes
- For a cleaner cut on the caramel layer, chill the bars thoroughly before slicing them into bars.
- If you prefer a softer caramel, reduce the cooking time slightly, aiming for a lower temperature.
- You can substitute milk chocolate or dark chocolate for the semi-sweet chips based on your preference.
Nutrition
- Serving Size: 1 bar
- Calories: 350
- Sugar: 35g
- Sodium: 110mg
- Fat: 22g
- Saturated Fat: 14g
- Unsaturated Fat: 8g
- Trans Fat: 0.5g
- Carbohydrates: 36g
- Fiber: 1g
- Protein: 4g
- Cholesterol: 30mg