
I used to walk right past the fancy fish counter at the grocery store. Honestly, handling high-quality yellowfin tuna felt like a move reserved for professional chefs, not someone still figuring out how to keep garlic from burning! But that’s what Kitchenican is all about, right? Proving that doubt is way scarier than the actual cooking. This recipe for Seared Ahi Tuna is your shortcut to a restaurant-quality main course that takes less than 20 minutes total. I’m Ava, and I promise you, after making this, you’ll look at a stunning piece of fish and think, “I totally got this.” You can read more about my own journey from novice to confident cook here.
- Why This Simple Seared Ahi Tuna Recipe Builds Confidence
- Essential Ingredients for Perfect Seared Ahi Tuna
- Equipment Needed for Your Seared Ahi Tuna
- Step-by-Step Instructions for Seared Ahi Tuna
- Tips for Success with Your Asian Tuna Recipe
- Serving Suggestions for Your Healthy Dinner
- Storing Leftover Seared Ahi Tuna
- Frequently Asked Questions About Yellowfin Tuna
- Nutritional Estimates for Seared Ahi Tuna
- Share Your Kitchenican Success
Why This Simple Seared Ahi Tuna Recipe Builds Confidence
When I first started cooking for myself, the idea of handling something as beautiful as sushi grade tuna felt totally out of reach. But that’s the magic of this dish! It proves you don’t need layers of complicated steps to make something spectacular. This Seared Ahi Tuna is built on simplicity, which is how we build real kitchen confidence here at Kitchenican.
- It’s truly a quick seafood recipe, meaning you spend less time stressing and more time enjoying your meal.
- You get a genuinely healthy dinner on the table without sacrificing any of that satisfying, gourmet flavor.
Fast Prep for Busy Schedules
Seriously, check out that prep time—only 10 minutes! That means you can conquer this fancy-looking dish right after work on a Tuesday. No long marinating, no slow simmering. It’s designed exactly for when you want great food without the fuss.
Achieving a Gourmet Tuna Dinner
The gorgeous crust you get from this quick searing technique makes you look like you’ve been cooking professionally for years. Mastering that deep sear instantly elevates your Seared Ahi Tuna. You’re not just making dinner; you’re creating an experience, and you did it all yourself!
Essential Ingredients for Perfect Seared Ahi Tuna
Okay, for this recipe to sing, you can’t skimp on the core components. This isn’t the place to substitute cheap cuts; we’re aiming for quality that shines through in just three minutes of cooking! Getting these ingredients right is the foundation for that incredible Seared Ahi Tuna you’ve been dreaming about. Here’s exactly what you need ready to go.
- Two (6 ounce) sushi grade yellowfin tuna steaks
- Two tablespoons sesame oil
- One tablespoon soy sauce or tamari
- One teaspoon grated fresh ginger
- One clove garlic, that you’ve minced up small
- Half a teaspoon black peppercorns, crushed up just a bit
- A quarter cup of sesame seeds (I love a mix of black and white ones for brightness!)
Choosing Your Sushi Grade Tuna
This is non-negotiable for our Seared Ahi Tuna! When you look for that ‘sushi grade’ label, you’re ensuring the yellowfin tuna has been handled properly so it’s safe to eat raw in the center. That beautiful raw center is what makes this dish so special. Also, remember my crucial first rule for searing: the fish has to be bone dry. Seriously, pat those steaks down until they feel like desert sand before you do anything else—moisture is the enemy of a dark crust!
Equipment Needed for Your Seared Ahi Tuna
You don’t need a warehouse full of specialized tools for this, which is just perfect, right? For this quick seafood recipe, we need gear that can handle serious heat. Don’t worry if you don’t have a fancy grill pan; we’re sticking to basics that get the job done fast. The most important piece here is the thing that creates that dark, crispy crust.
Here’s the short list of what you’ll want pulled out of the cupboard:
- A heavy-bottomed skillet, ideally cast iron. Trust me on the cast iron; it holds heat like a champ, and that intense, even temperature is what guarantees a perfect sear on your Seared Ahi Tuna.
- Paper towels. So many paper towels. You need these for drying the fish, don’t skip that step!
- Two shallow plates or bowls—one for the pepper crust and one for the sesame seeds.
- A small whisk or fork for mixing up that easy marinade.
- A sharp knife for slicing once the fish rests.
That’s it! See? No complicated gadgets required to turn out a gourmet tuna centerpiece.
Step-by-Step Instructions for Seared Ahi Tuna
When I first started making this, I was so nervous about burning everything! But honestly, because the cook time is so fast, the margin for error is actually quite generous—as long as you pay attention to the heat. Remember that step where we patted the fish dry? That’s our huge E-A-T tip right there. It ensures that the searing process happens instantly instead of the fish steaming in the pan. Now, let’s move to making this a truly impressive, though simple, Seared Ahi Tuna.
Preparing the Flavor Coating for Seared Ahi Tuna
First, we jazz up the flavor just a little bit! Grab a tiny bowl and whisk together the sesame oil, soy sauce (or tamari if you prefer!), that fresh ginger, and the minced garlic. You only need a light coating, so brush this mixture gently over every part of those tuna steaks. Don’t let them soak, we just want a thin, sticky layer so the crust sticks.
Next, grab your two plates. One needs those crushed black peppercorns, and the other needs those beautiful mixed sesame seeds. Roll the coated steaks first into the pepper—press gently so they adhere. Then, immediately roll them into the sesame seeds until they look totally coated, almost like little fishy jewels. Make sure they’re covered evenly!
Mastering the High-Heat Sear
This is the climactic moment! Put your cast iron skillet on the burner and turn that heat up to high. You need this pan screaming hot—we are talking almost smoking hot. Do NOT add extra oil to the pan; the flavor coating we just put on has enough fat. Carefully lay your coated tuna steaks down. You should hear an immediate, aggressive sizzle. That’s the sound of success!
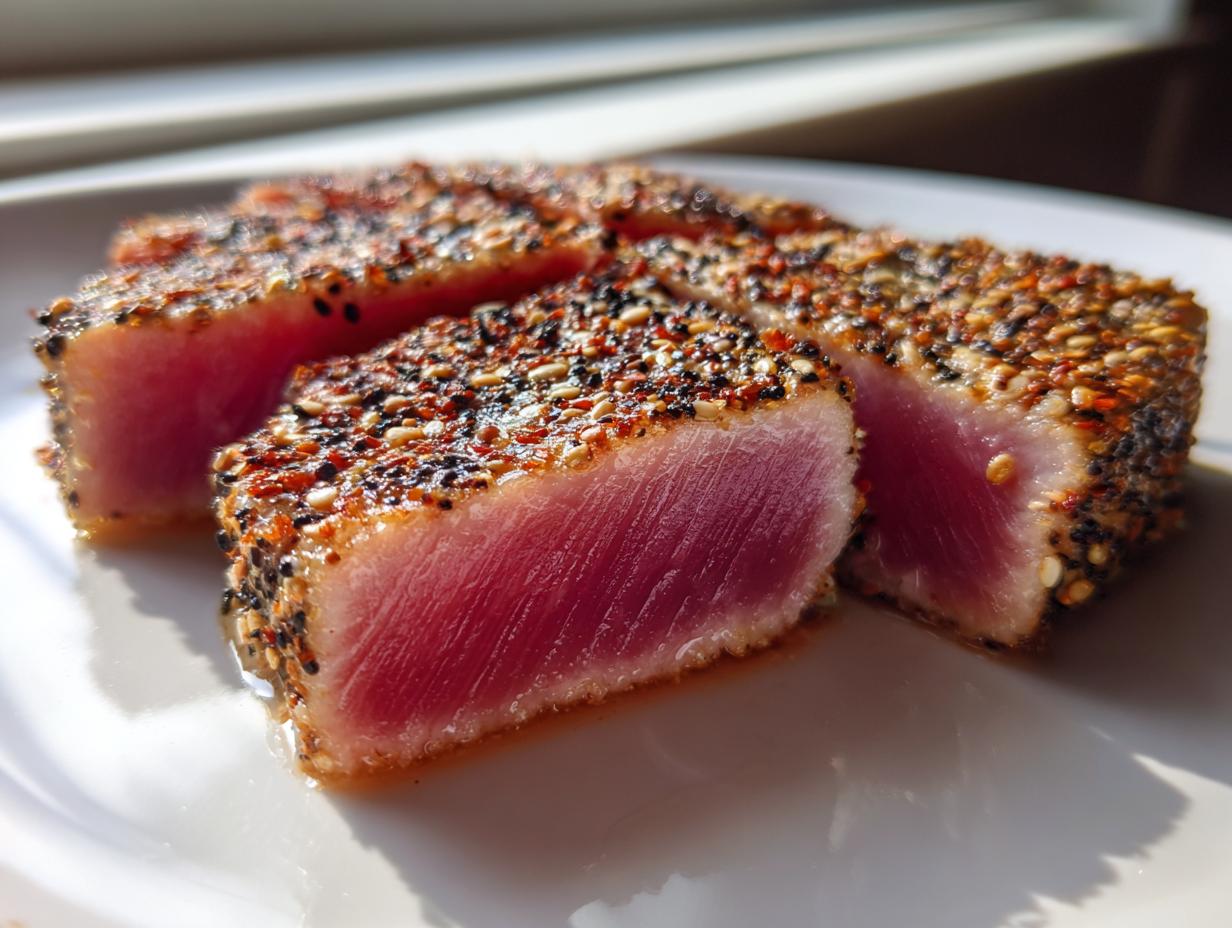
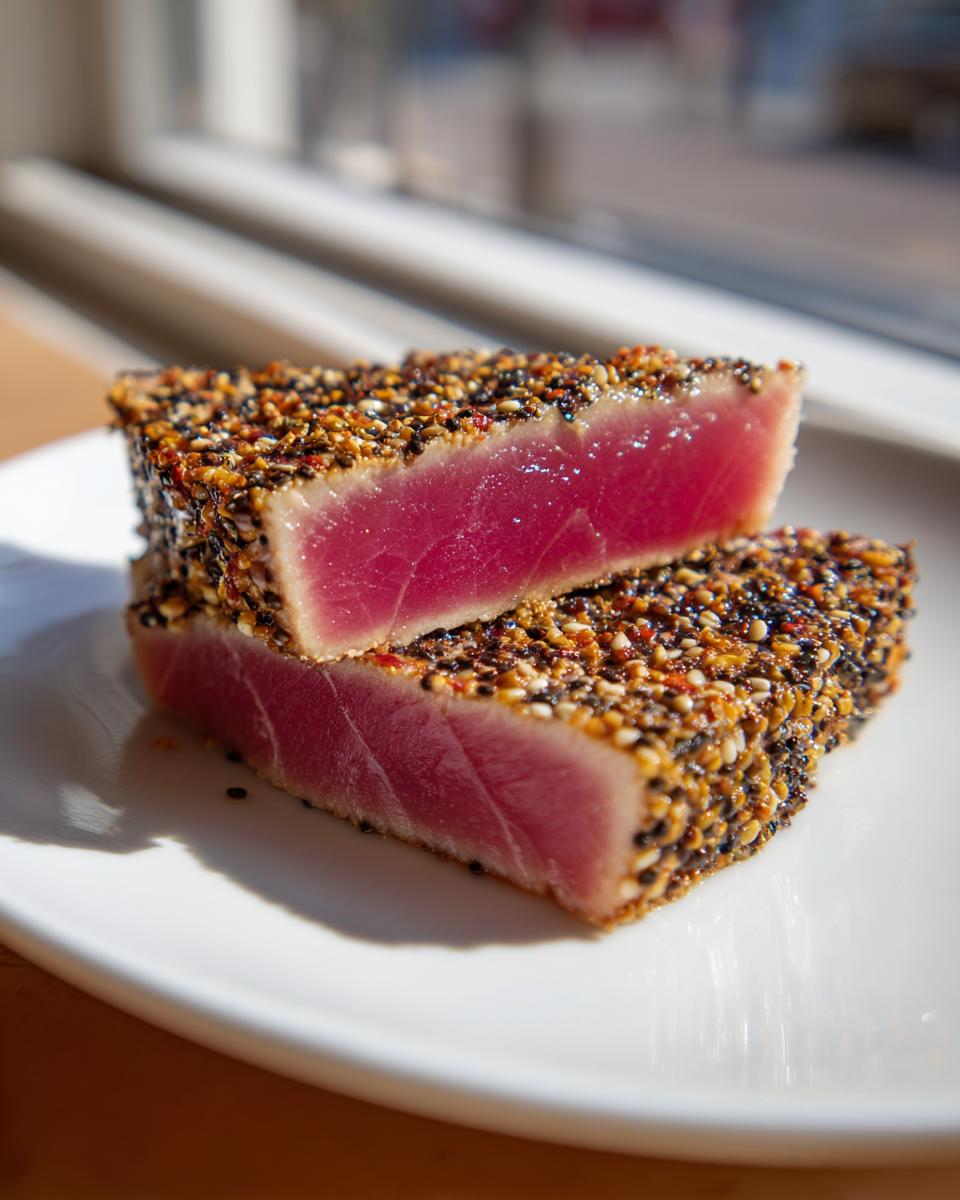
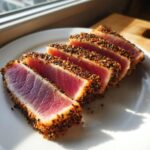
For that perfect rare center, sear them for only 60 to 90 seconds per side. I usually count quickly to 75 on the first side, flip, and count fast again. This low-time, high-heat technique creates that amazing dark crust that defines great pan-seared tuna. Don’t be tempted to overcook it!
Resting and Slicing Your Seared Ahi Tuna
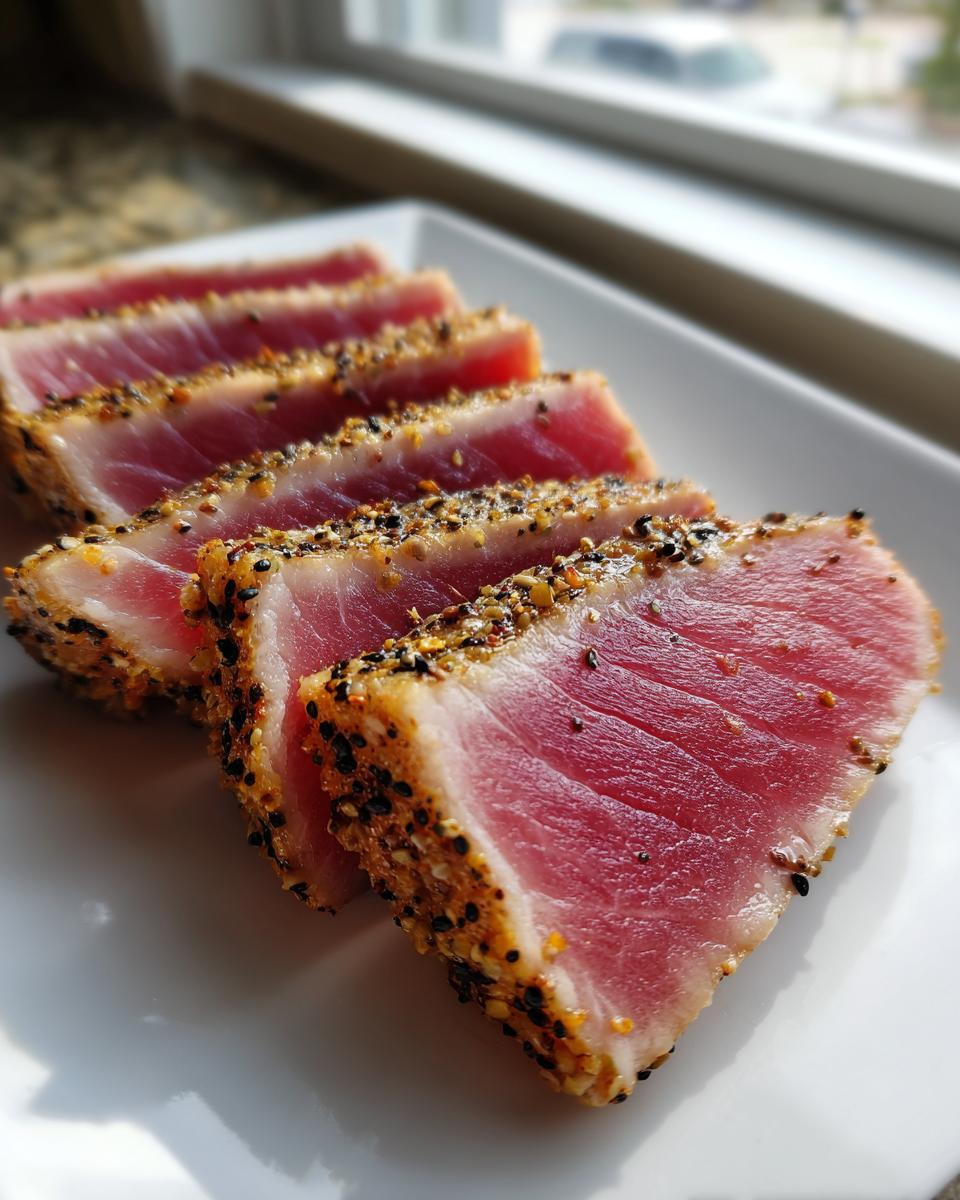
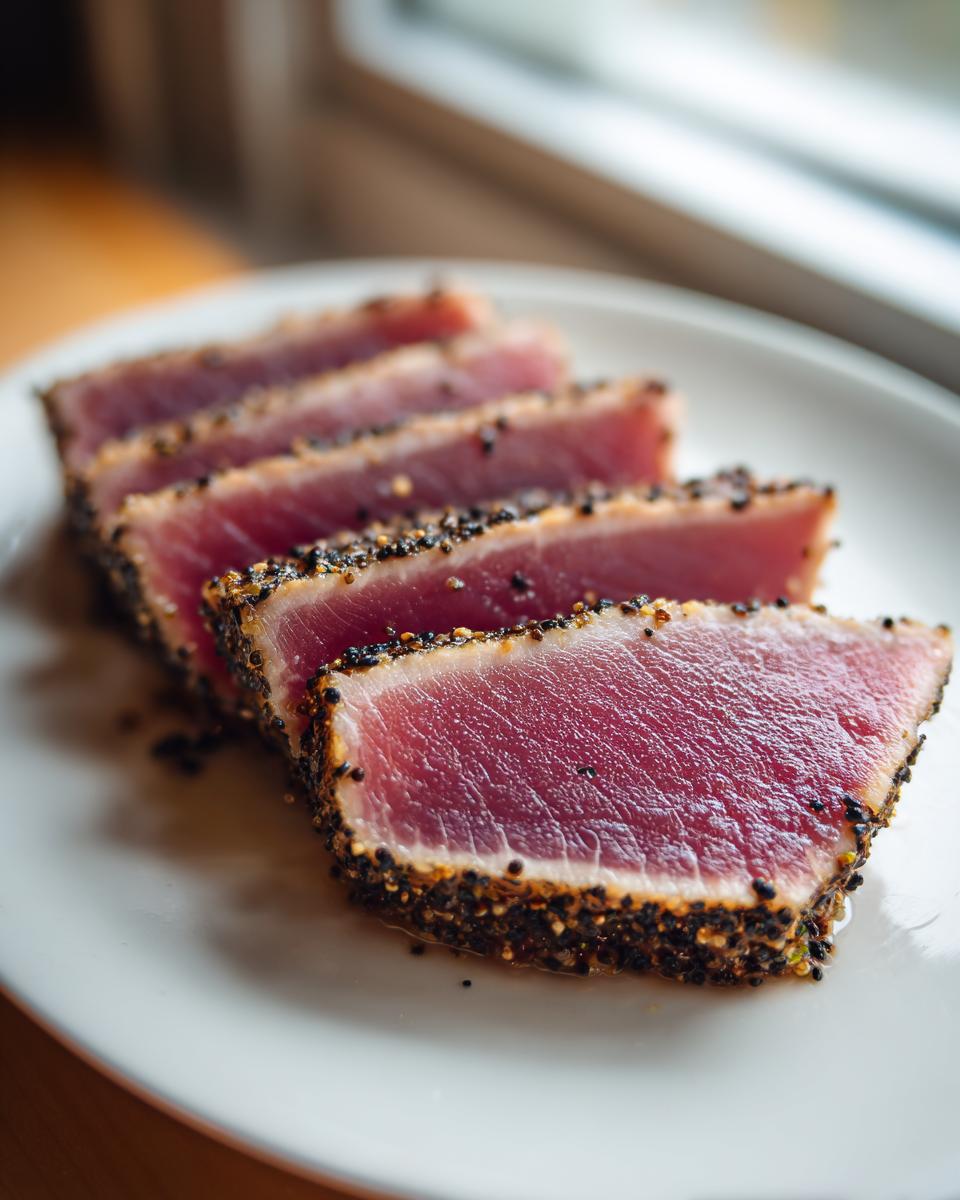
Once they look perfectly crusted, pull them out right away! Place the steaks on a cutting board—don’t skip the 5-minute rest. Even though it’s a quick-cooking process, resting lets the residual heat distribute evenly, preventing the very edge from turning grey while you slice. When you’re ready, take your sharpest knife and slice the tuna against the grain into beautiful, half-inch thick pieces. Slicing against the grain is the secret to making sure every bite melts in your mouth!
Tips for Success with Your Asian Tuna Recipe
Look, I know the searing time sounds terrifyingly short. When I first tried this, I kept peeking like I was watching a pot that was definitely going to boil over! But trust me on this—the beauty of this Asian tuna recipe is the raw center. If you pull it out too late, you end up with dry, boring fish, and we definitely don’t want that.
If you are worried about sticking, or maybe you’re using tuna that’s a little less perfectly shaped, you can definitely swap out the soy sauce for coconut aminos. It keeps that salty, umami punch but makes this recipe naturally gluten-free and it’s such an easy switch!
Controlling the Doneness of Seared Ahi Tuna
The goal here is a clear, dark, well-defined crust against a cool, nearly raw interior. This gives you that wonderful textural contrast, which is why we love Seared Ahi Tuna so much! If you absolutely cannot handle rare, you can add 30 seconds to each side on that high heat. But that’s my personal limit. Seriously, don’t go past that medium point, or you lose all that incredible melt-in-your-mouth texture we worked so hard to achieve.
Remember, the tuna continues to cook slightly while it rests, so pulling it off the heat right when the crust looks perfect is the absolute key to success. It’s easier than you think once you trust the timer—or your intuition!
Serving Suggestions for Your Healthy Dinner
You’ve mastered the sear, coated your beautiful tuna, and now you need to send it off with the perfect supporting cast! Since this is such a flavorful and high-protein healthy dinner, you don’t need complicated sides. We want things that complement that vibrant, Asian-inspired flavor without stealing the show from our star ingredient.
I usually keep it super simple. A bed of fluffy white rice or maybe some simple brown rice soaks up any extra marinade beautifully. If you’re doing low-carb, some lightly steamed edamame or quick-pickled cucumbers work wonderfully to add crunch. Steamed snap peas tossed with a tiny bit of soy sauce are also a winner!
Don’t forget those flavor boosters we mentioned in the notes—they aren’t just suggestions, they’re essential for a full experience! Have a small dish of wasabi paste ready on the side for those who like a little kick. A tiny dab with a slice of the tuna is amazing. Or, if you prefer something lighter than wasabi, just a quick drizzle of plain rice vinegar over the sliced tuna right before serving adds a nice, bright tang. It just pulls all those sesame and ginger notes together perfectly for an incredible, yet simple, meal!
Storing Leftover Seared Ahi Tuna
Okay, let’s talk leftovers, because sometimes we make too much (or maybe you’re just lucky enough to have extra!). The beauty of a high-quality, quick-seared fish like this is that it tastes fantastic even the next day, but you absolutely have to treat it right. Remember, this isn’t a tough pot roast; it’s delicate, beautiful yellowfin tuna, so we don’t want to mess up that gorgeous crust or texture.
The absolute best advice I can give you is this: plan on eating your leftovers cold or at room temperature. Seriously, resist the urge to reheat them!
How To Store Your Leftover Tuna
First, make sure you’ve sliced up whatever you plan to keep. Trying to store whole, seared steaks is a recipe for drying them out under the wrap. Once sliced (remember, half-inch thick!), lay the pieces flat or gently arrange them in a single layer in an airtight container. Don’t be tempted to toss them in the fridge uncovered; they’ll dry out lightning fast.
I always line the container with a fresh paper towel before adding the slices. This just absorbs any tiny bits of moisture that sweat out, keeping the texture nicer. Pop the lid on tight and stick it right into the coldest part of your refrigerator. Honestly, three days is about the maximum I’d push it for peak quality, but usually, there aren’t any leftovers!
The Best Way To Enjoy Chilled Ahi Tuna
When you pull that container out the next day, resist the microwave button! Zapping this Seared Ahi Tuna will turn it grey and rubbery, and we worked too hard for that stunning sear to ruin it!
My favorite way to eat the leftovers is straight from the fridge on a bed of simple mixed greens, maybe with a little drizzle of rice vinegar and sesame seeds sprinkled on top. It turns into a fantastic, quick lunch salad—super high in protein and still feeling incredibly gourmet. Another trick is to chop the cold slices up finely and mix them with a spoonful of avocado or a little lime juice to make a quick, deconstructed tuna poke bowl base. It’s fresh, it’s easy, and it honors the quality of the fish without ever needing heat!

Frequently Asked Questions About Yellowfin Tuna
It’s totally normal to have questions when you’re moving up the culinary ladder, especially with amazing ingredients like yellowfin tuna. I get asked about quality and technique constantly! Don’t feel intimidated; that’s why I’m here to share what I’ve learned making this Seared Ahi Tuna over and over again. Getting the sourcing and the final cut right makes all the difference for the texture.
Can I use frozen tuna for this Seared Ahi Tuna recipe?
Yes, you absolutely can, but you have to respect the thawing process! If you start with frozen tuna, you need to let it thaw overnight in the refrigerator—never hurry it on the counter, as that can compromise the safety and texture of your sushi grade tuna. Once it’s fully thawed, you need to treat it exactly like fresh fish: blot, blot, blot! You need it completely dry before you even think about brushing on that marinade layer. Any surface moisture will steam the fish instead of searing it.
What is the best way to slice the tuna?
This is one of those small details that makes a huge difference in your dining experience! You must slice the tuna against the grain. If you look closely at the steak, you’ll see muscle fibers running in one direction. Slicing across those lines shortens those fibers, making the tuna tender and buttery in your mouth. If you slice parallel to the grain, even perfectly cooked tuna can feel chewy. Take your time for this final step when you serve your healthy dinner!
Remember, whether you’re making this a quick pan-seared creation or using it in a poke bowl, slicing correctly ensures that perfect melt-in-your-mouth consistency every single time.
Nutritional Estimates for Seared Ahi Tuna
Okay, I know how much we all love knowing the details about what we’re putting into our bodies, especially when making something as lean and fresh as a Seared Ahi Tuna dish. Since we’re all dedicated to making real food in our own kitchens, I always make sure my recipes are built around healthy eating principles. This dish is definitely a winner in that department—it’s packed with protein and super low in anything heavy!
But here’s the thing about home cooking; every tablespoon of oil you use might be slightly different, and the exact size of your yellowfin tuna steak can vary even if you buy the same weight. Because of that wonderful variability that comes from cooking in your own space, I’ve always felt it’s best just to give you guidance rather than strict numbers.
The nutritional values I calculate are always just estimates based on the exact ingredients listed above. Things like the exact amount of sodium in your soy sauce or the precise size of the garlic clove you mince can shift those totals slightly. So, take these figures as a general map, not a final destination! What you should know is that this is a wonderfully clean, high-protein, low-carb quick seafood recipe that supports almost any healthy eating plan.
If you want the precise breakdown for your specific ingredients, I recommend plugging the ingredient list into your favorite tracking app. But honestly, when you’re eating something this fresh and simple, the feeling of eating good food is the best indicator you need!
Share Your Kitchenican Success
Now you’ve done it! You’ve taken what might have once felt like a high-stakes culinary move—perfectly searing Seared Ahi Tuna—and you absolutely nailed it. That’s the spirit of Kitchenican shining through! I genuinely want to see what you created. Whether you stuck to my simple sesame seed coating or went wild with a spicy rub, your success inspires the next person who thinks they “can’t cook” that beautiful fish.
The best compliment I can receive is knowing that this recipe helped bridge that gap between inspiration and actually getting something delicious on your plate. Once you’ve devoured every last piece of that incredible yellowfin tuna, please come back and drop a quick star rating for me. It helps other home cooks feel confident enough to try it next!
If you snapped a picture of your beautifully crusted, rare center, share it on social media and tag us—I absolutely love seeing your creations! And if you have any burning questions that didn’t get answered above, or maybe you want to tell me how it compared to your old takeout go-to, please reach out through the contact page. We’re building this kitchen community together, and hearing from you is the best part of my day. Don’t hesitate to connect with me through my contact form!
PrintSimple Seared Ahi Tuna Steaks
Learn how to perfectly sear sushi grade tuna steaks for a quick, healthy, and gourmet dinner.
- Prep Time: 10 min
- Cook Time: 3 min
- Total Time: 18 min
- Yield: 2 servings 1x
- Category: Main Course
- Method: Pan Searing
- Cuisine: Asian Inspired
- Diet: Low Fat
Ingredients
- 2 (6 ounce) sushi grade yellowfin tuna steaks
- 2 tablespoons sesame oil
- 1 tablespoon soy sauce or tamari
- 1 teaspoon grated fresh ginger
- 1 clove garlic, minced
- 1/2 teaspoon black peppercorns, crushed
- 1/4 cup sesame seeds (mixed black and white)
Instructions
- Remove the tuna steaks from the refrigerator 15 minutes before cooking. Pat them completely dry with paper towels. This step is key for a good sear.
- In a small bowl, whisk together the sesame oil, soy sauce, ginger, and minced garlic. Brush this mixture lightly over all sides of the tuna steaks.
- Place the crushed black peppercorns on one plate and the sesame seeds on another plate.
- Roll the coated tuna steaks first in the crushed peppercorns, pressing gently so they adhere, then roll them in the sesame seeds until fully coated on all sides.
- Heat a heavy-bottomed skillet (cast iron works best) over high heat until it is very hot, almost smoking. Do not add extra oil to the pan.
- Carefully place the coated tuna steaks in the hot, dry skillet. Sear for 60 to 90 seconds per side for rare to medium-rare. You want a dark crust and a cool, raw center.
- Remove the tuna from the pan immediately. Let the steaks rest on a cutting board for 5 minutes before slicing.
- Slice the tuna against the grain into half-inch thick pieces. Serve immediately.
Notes
- For an Asian tuna recipe flavor boost, serve with a side of wasabi paste or a drizzle of rice vinegar.
- If you prefer your tuna cooked slightly more, add 30 seconds to each side, but avoid cooking past medium, as it loses its best texture.
- You can substitute soy sauce with coconut aminos for a gluten-free option.
Nutrition
- Serving Size: 1 steak
- Calories: 280
- Sugar: 1
- Sodium: 350
- Fat: 15
- Saturated Fat: 2
- Unsaturated Fat: 13
- Trans Fat: 0
- Carbohydrates: 5
- Fiber: 1
- Protein: 30
- Cholesterol: 75